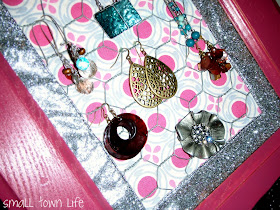
I actually made this earring holder awhile back, but just now getting around to blogging about it...bad me, I know! Picture overload...
I will show you step-by-step pictures with explanation on how I re-purposed these cabinet doors into a Fabulous Earring Holder. It might seem like a lot of work, but it wasn't! I actually had some fails which I will be sharing those too, which will help me when I go to create a matching Necklace holder next!
You'll need: Old Cabinet Door Frame, MDF Wood to fit inside frame, spray paint, wood filler, sanding block/sandpaper, chicken wire, favorite fabric, hot glue gun/sticks, thick ribbon (atleast 1.5"), thumb tacks, saw tooth hanger.
First: measure the inside part of your cabinet door where the MDF will set. Next measure out the MDF (FREE, random piece we had laying around) and have your handsome man cut it for you (unless you're brave enough to do it yourself, but I don't know how to run those things!).
Next...If your door has holes in it from where the hardware went, you'll want to grab your wood filler (make sure it's the paintable/stainable kind), and squeeze some in each hole. Don't worry if you put too much in it. Let it dry for a few minutes (maybe 10-15, I was in the sun), and lightly sand off the excess.
After sanding, filling holes, and sanding holes, it's time to spray paint! I did it outside in the yard, so I grabbed a trash bag and layed it on the ground. Be sure to do light strokes back and fourth, and don't forget to shake the can every once in awhile. I did a couple of coats, drying it in between each one, until it was completely covered and the color I wanted. I used Krylon Raspberry Gloss spray paint, love it! I have plenty left over for the next project, score!
Grab your fabric and measure out how much you'll need. I didn't care if it was covered all the way, measured to have about 2 inches or so left for each edge. I got this fabric at Walmart for around $3.50 (give or take) for 1 yard, and have plenty leftover for my Necklace Holder. Isn't it fun?
Yes, another "fail"...after I glued the fabric down I wanted to attach the Chicken Wire (FREE, we have a bunch in our backyard from when we bought the house) which will hold my earrings. Except the chicken wire had a mind of it's own and wouldn't lay flat. So I thought I would nail the edges down...wrong! The nail heads weren't wide enough, and if I wouldn't went with something bigger (that we had on hand) the nail wouldn't been too long. So I decided to use thumb tacks, which worked! So I used those on the edges to hold them in place.
The thumb tacks worked great holding the Chicken Wire down, but when I placed the frame over you can see the thumb tacks. So this wasn't really a fail, I call it a minor fail or hiccup. So I grabbed some sparkly silver ribbon (purchased from Walmart, for around $4 a roll and have a bunch left), glued it down on the edges and made the corners pretty, which I loved when I was finished with it!! It dresses it up, makes it even more girly than before!
And last I added a saw tooth hanger (purchased from Walmart). This was the last step before I attached the frame to the board with glue. It sounds like it was a lot of work, but it really wasn't, mainly trying to figure out what would work! The necklace holder will be easier next time around. Here is the finished product, which I think turned out fabulousco for only costing around $8 compared to how much the Pottery Barn ones costed (I think they ranged between $35-50, something like that).
I have it hanging on the inside of my closet door, which is where I also plan to hang the necklace holder once I finish it. I just love it, because I can see very clearly what earrings I have to choose from, instead of fumbling through a little clutch that I had them in before. What do you guys think?!
Linking up too...


