Friday, December 23, 2011

Merry Christmas to All

I was going to share a recipe for some yummy pretzels, but I haven't gotten pictures taken.  So instead I will just leave you with me wishing you all a VERY Merry Christmas!!!

Tonight is our company Christmas party, pretty excited for that.  After this week, I feel like I just need
to relax and have a good time!  It's been such a crazy week, that's for sure!!

Tomorrow we will do Christmas with D's parents in the afternoon, open gifts, shoot the bull.
Tomorrow night we will go to D's grandparents house to stuff our faces full of yummy
homemade food, open presents, scratch lottery tickets, play Christmas games,
and chat with family. 
Somewhere in there I will give D his Christmas Gifts...
if he can be good that long, that is!!

Sunday morning we will head off to my {small} hometown and spend lunch and part
of the afternoon with my dad, and then head off to my other grandparents/mom's
for more yummy homemade goodness and presents.  I think my favorite part
about Christmas is hanging out with family and eating all of the delicious food!!

Monday we are closed at work, so I'm hoping to get home at a decent time so I can get in a little R&R!

Anyways, I hope you all have a MERRY CHRISTMAS!!!  Be safe and stay warm!

2011 Christmas Tree


Wednesday, December 21, 2011

Christmas Goodies {Recap}

I have some different things on my Christmas Baking List this year, but before I share those, here are some that I made last year and blogged about.  Hope you find one to try out!! :)

Cinnamon Roasted Almonds (my all time fav! just as yummy as the ones you buy at the mall and will be making these again!!)


Caramel Nut Bars (these were great, but need to make sure to keep in the refrigerator until ready to cut, and after they are cut. the caramel gets really gooey!)


Oreo Truffles (didn't get around to making them for Christmas last year, but on my list again this year! so yummy!)


Homemade Peanut Butter Candy "Cane"ine treats (can't leave the dogs out! will be making these again also!)


Linking up too...

Tuesday, December 20, 2011

Winter Subway Art Tile

Whew...I'm feeling a little crazy after all of those projects last week and our long weekend away to the {big} city, and I haven't even began baking and barely started wrapping gifts!  I'm not going to lie, I'm a little exhausted!!  LOL! 

Friday late afternoon we headed to the {big} city to see my mom, have her Funky Zebra party, and then we went to the Chiefs/Green Bay game on Sunday.  We had a BLAST and I am still shocked that KC pulled off a win against Green Bay who was undefeated going into Sunday.  It was amazing!!  Monday we did some quick last minute Christmas shopping before we hit the road...the HUGE winter storm was on it's way in.  We didn't beat the storm home, but we did make it home safely after about 7 hours of driving.  It normally only takes us 4.5 hours, so we were ready to get home.  It was pretty scary, seen a lot of cars in the ditch, had to call in for 1 person who didn't have a phone.  There were several times on the last hour stretch home (which took like 2 hours) that we couldn't see a thing...it was a white out.  But WE MADE IT!  Thank you Lord for guiding us home safely!! :)  Not sure on the official amount of snow that we received, but I'm thinking at least 7-9 inches, with drifts over 2 feet tall.  We could barely get our back door open, and it was packed up against the shed doors.  This is the time I wish I were still in school so I could have a snow day!!! LOL!


Now on to my next project I created last week...Winter Subway Art Tile!!  I should be set for all 4 seasons now, maybe I'll start creating ones for each Holiday that I already haven't...we'll see! 


This time I used a light colored Tile, several different font cartridges, and Dark Green vinyl that I purchased from Expressions Vinyl.  I think it tuned out pretty cute!!  I also used my CDS software to help me get it layed out the way I wanted it, and this time I applied them in sections.  It was a lot easier.


Here are my previous tile's I made for the other seasons...check them out! 

Spring

Summer

 
Autumn/Fall

Well we are officially done Christmas shopping, well 98% done anyways.  I have a few more gift certificates to grab, but other than that we are done.  Now just to get everything wrapped before Saturday, and goodies baked!! :)


PS - HURRY!!! There is still time to use Expressions Vinyl Promo Codes to receive a special discount, just click on the link, place your order and enter in promo codes, and viola!
XMAS2011 - 10% off your entire order (excludes Machines & Software), expires 12/31/11.
FROSTY - 15% off Cricut and Silhouette accessories (excludes Machines & Software), expires 12/31/11.
CHESTNUT - free shipping on orders over $50 (U.S. only, $7 credit for other shipping methods), expires 12/31/11.

Linking up too...
It's A Blog Party
The Girl Creative
Today's Creative Blog
The Shabby Chic Cottage
What Allie's Making Now
Somewhat Simple
Lovely Crafty Home
The Sisters of the Wild West
Polka Dots on Parade
Just a Girl
Ginger Snap Crafts

Friday, December 16, 2011

Christmas Ornament Wreath

You've seen Christmas Ornament Wreaths allover blog land and Pinterest, but I just had to share mine with you today!  I've wanted to make one since last year, and finally got around to doing it.

Before I get started showing you how I did it, I wanted to share with you a few things that I pinned on Pinterest to help me along with this project. 

First, you've probably already seen this, but the wreath forms at craft stores can be expensive.  I saw this pin on how you should purchase a pipe installation tube from Home Depot or other home improvement store for less than a $1.  Check.

Second, once I got the foam installation tube, I quickly realized that there would be some issues trying to form a circle without it kinking. Hmmm...so I read an article from the same blog that gave us the money saving tip above and pinned it here.  Check.

Last, I read the article above and then read the comments.  I noticed there was a reader/blogger who tried the tips listed and came up with her own way to correct the kinking tube problem.  So headed over to her blog, read her article, and pinned it here.  Check.


And for the heck of it, even though these wreaths are everywhere (and I love 'em) here is one I pinned for inspiration.  Matt & Becky shared their helpful tutorial that got me going! Check.

Now onto my creation...

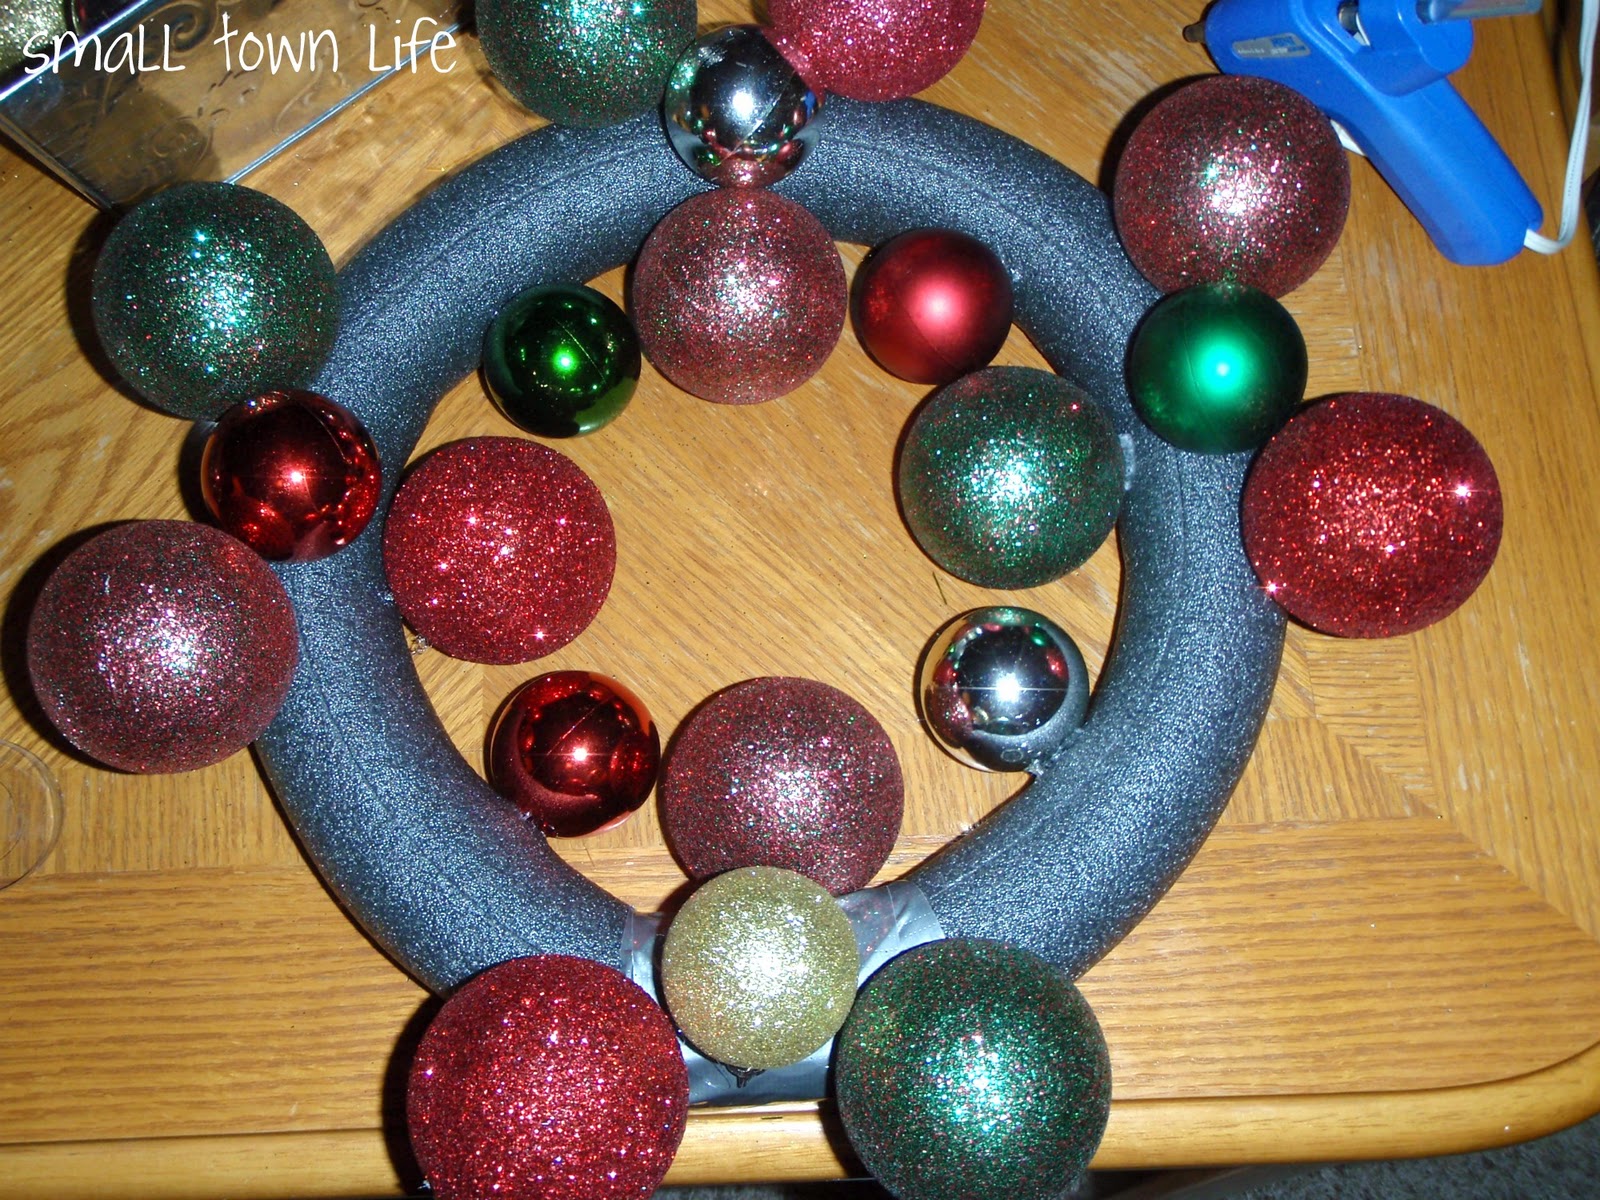
First, I cut the pipe installation in half.  I tried to make it a nice circle without the kinks without doing some further reading and that was a fail.  So I read the 2nd & 3rd "pin" listed above and quickly realized how to make it happen.  I took several plastic grocery bags (I save them for random uses, but didn't know they would be part of this project!), wadded them up, and stuffed the tubing with them.  You might need to use something with a long handle like a broom stick to get them packed in there tight.  Then I was able to create a "kink-less" circle for the wreath, and taped the ends together with duct tape.


For this next part you will need a lot of Christmas Ball Ornaments, a ton of hot glue sticks, and patience!  I started with the bigger ball ornaments first, gluing them on the outside and inside of the wreath.


After that I took the next size and started to fill in around the bigger ones.


Then I took what I had left (a bunch) and randomly started gluing them everywhere on the wreath.  As you go it builds itself up, and turns into something really neat.  I didn't put any on the backside, and you could still kind of see the foam, so I had some leftover gold garland from my Nativity Scene Tile and kind of weaved it in and out of the open space on the back.  That seemed to do the trick for my wreath, and it added some extra pizazz!  I have it hanging on our mirror above our dining room table.  I think it looks great there! 


Finished product!
Don't mind the dirty mirror or bad lighting, it was at night! ;)
 I had around 85 ball ornaments, but I didn't quite use all of them, but I used all of my glue sticks!!  LOL!  I purchased most of the ornaments from Target in the dollar spot, it was awesome! The others came from Hobby Lobby and a local store.  The reason I say patience is key, is because all you are doing is glue & stick, glue & stick, glue & stick some more!  All in all it was a fairly easy and inexpensive project!  I love it!!


Linking up too...

Wednesday, December 14, 2011

{Dressing up} a Hobby Lobby Christmas Sign

Almost a month ago, my future mother-in-law purchased a sign from Hobby Lobby in their Create Christmas Craft section for $4.99, on sale for $2.50.  She came and found me in the store and excitedly asked if I would spruce it up a little for her...like add some vinyl and such.  Of course I was glad to help her out, seemed like it would be easy enough anyways.  Last night rolled around and I decided I would knock the project out of the way (seems like a million more to go and not enough days!).

Blank Holiday Sign from Hobby Lobby

Using CDS I typed out WELCOME using Cherry Limeade cricut cartridge (which was a black friday deal for $12.99 btw!).  Adjusted the sizing how I wanted it and cut it out on white vinyl.  Next I measured out how big I wanted the next part to be, "The Myers", typed it into CDS using Billionaire cricut cartridge (also a black friday deal for $12.99!), and cut it also onto white vinyl.  I peeled off each letter of all 3 words and carefully stuck them on the sign where I wanted them.  It was looking good!  Then I had a vision of adding white pretty glitter, so I grabbed some Modge Podge, using a Q-Tip or toothpick and applied it onto the letters, and then covered everything in glitter.  After I let it set for a few minutes, I shook off the excess.

The finished product
 I think it looks pretty and welcoming!  She will be able to use this sign not just for Christmas, but for all Winter long if she wants too.  This was a pretty inexpensive project, and I think she's going to really like it!  What do you think?

I can't wait to become a Myers! ;)


I also purchased a blank sign from Hobby Lobby, and am in the process of fixing a fail...go figure!!  I'll post it once I get it fixed!! :)


Looking for a promo code for Expressions Vinyl?  I have the PERFECT ones for you...
XMAS2011 - 10% off your entire order (excludes Machines & Software), expires 12/31/11.
FROSTY - 15% off Cricut and Silhouette accessories (excludes Machines & Software), expires 12/31/11.
CHESTNUT - free shipping on orders over $50 (U.S. only, $7 credit for other shipping methods), expires 12/31/11.


Linking up too...

Tuesday, December 13, 2011

Inspired Heart Nativity Scene Tile, plus promo codes

D's Grandma Bonnie LOVES anything Christmas!  She loves religious themed (after all that's what CHRISTmas is all about), anything Santa, Snowman, etc.  She decorates her entire house when it comes time, as well as the outside.  Everything looks so cute and inviting, I love going over to visit, but especially at Christmas time. 

This year I was pondering what we should get her for Christmas, it's so hard when they already have everything they need.  I really wanted to make her something, and I remembered that I had the Inspired Heart Cricut cartridge.  So I started looking over it, and saw that there was a Nativity Scene, that has Mary, Joseph, and Baby Jesus in the manger.  I knew that was it, so I started to think about how I wanted to lay it out.  And of course I would put it on a dark 12x12 ceramic tile! 

Using my Cricut Design Studio, I got it all arranged how I wanted the finished product to look.  Then I cut out the "outline/shadow" of the Nativity Scene in my Gold Metallilc vinyl that I purchased from Expressions Vinyl.  Next I cut out the actual Nativity Scene itself using Dark Red vinyl, which I also purchased from Expressions Vinyl.  I grabbed my transfer tape and stuck them on the tile, centering and sticking down where I wanted them to be.  The Gold part was first, then the Red Nativity Scene was second.  I needed something else, so I got out my Accent Essentials cartridge and cut out 3 stars to put in the corners on Gold Metallic vinyl. 


I could've left it as is, but it still needed a little *sparkle*.  So I decided to use glitterfy the stars using Modge Podge and Gold Glitter.  And then I got some Gold Tinsel Garland and hot glued 2 strands at the bottom.  Viola...it was finished!!  I think it looks really neat, and will be a nice addition to her decor!!


NLT Isaiah 9:6 - For a child is born to us, a son is given to us. The government will rest on his shoulders. And he will be called: Wonderful Counselor,[d] Mighty God, Everlasting Father, Prince of Peace.

Source
Looking for a promo code for Expressions Vinyl?  I have the PERFECT ones for you...
SNOWBALL - 25% off ALL vinyl!  So indoor vinyl, outdoor vinyl, patterned vinyl, t-shirt vinyl, specialty vinyl.  Just vinyl, not accessories or transfer tape.  It is good for today December 13th only!
XMAS2011 - 10% off your entire order (excludes Machines & Software), expires 12/31/11.
FROSTY - 15% off Cricut and Silhouette accessories (excludes Machines & Software), expires 12/31/11.
CHESTNUT - free shipping on orders over $50 (U.S. only, $7 credit for other shipping methods), expires 12/31/11.


Linking up too...

Wednesday, December 7, 2011

In the middle

Do you ever have a lot of different projects going on at the same time, but you're not able to share any of them right away?  That's the boat I'm in right now.  I've been busy getting our house decorated (inside), and a few different Christmas projects started...now I just need to finish!  I'm currently working on a cheap sign from HobLob that I dressed up with some vinyl and glitter, a tile for D's Grandma (gift), and a Christmas Ornament Wreath that you've seen all over blogland/pinterest.  I'm also wanting to wrap some greenery around our porch outside, and trying to get D to hang up our Christmas lights.  Not sure the later part will happen though, it's deer season here, and then in 1.5 weeks we are going out of town, and then it's Christmas.  Sigh.  Oh well, there is always next year!  Making a mental note to have him hang them in the fall when it's nice and it's not any kind of hunting season!! ;)

When I was getting all of our Christmas decor out last week, I found something that got me really excited and into the Christmas spirit.

That's right...my UGLY Christmas Sweater Ashley made us last year to wear on Christmas Day.  It needs a little work, but that will be easy.  So excited to wear it, along with some fun Christmas Ornament earrings I found at Claire's last year after Christmas on clearance!  Score!

And on another note, a few nights ago Bernie was all fired up, and then layed under the tree and started playing with his Pheasant.  It was too cute!!


I'm hoping to get some projects done tonight, so I can share them with y'all soon!  How is your Christmas decorating, projects, and baking coming along?

Friday, December 2, 2011

What I Wore Friday {because of Pinterest}

Tonight I have a Funky Zebra Party, that means I get to leave my real job an hour early.  I like to look nice for my Funky Zebra Parties; I push away my normal go-to shirts that I wear to work and wear something cute along with accessories.  I wanted to wear my new sweater dress that I got from Body Central, but it's a little chilly and I have to travel a little bit to my destination.  Plus, working in an oilfield office wearing a sweater dress, not really something I want to do.  However, maybe I'll wear that tomorrow for my "Open House" Funky Zebra Party I'm hosting...we'll see! ;) 

Pinterest Pin

Anyways, on to what I'm wearing today...it was inspired by a Pin I spotted on Pinterest yesterday...that site is way too addicting.  My version is pretty similar, but my scarf is more of a peach color. 


Sorry about the poor picture quality, I took it at my office this morning since I am the only one here today. Yay for Camera timers!! ;)

The breakdown:
Black long sleeve shirt = Kohl's Black Friday deal $6.99
Pink cami = not sure, have had it for years
Jeans = BKE Brand purchased a couple years ago, Sabrina style
Black Slouch Boots = Maurices (Christmas gift last year. For the party tonight, I will slip on my dressier black heeled boots that D got me for Christmas a few years back!)
Peach scarf = Christmas gift last year from my employer
Bangles = Funky Zebra $10
Blingy Hoops = Store in Lakin KS $7.99
Flower Ring = Dillard's clearance (not sure, but I think it was like $6-7)
Hair = curled with an Infiniti Curling Iron Wand and pinned back half way


I think it's very simple, but fun with all of my accessories!  What do you think?  Have a great weekend y'all!! :)